
DIY: Brick Wall Update
- Feb 12, 2019
- 3 min read

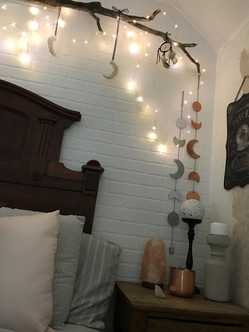
Hey all! If you've been following along, the last thing i posted about was the moon wall decor on the brick wall above my bed. What I didn't realize is that I hadn't yet told you guys about that brick wall!
Its a fake. But it still looks beautiful! I've wanted to put up this brick wall since i first moved back to my parents house over two years ago. I've wanted to help my parents fix up their 140 year old farm house as a thank you for letting me move back in and disrupt their life with my issues.


As you can see, the wallpaper was old and outdated and all but falling off the wall. So after dealing with so many financial issues and setbacks, i FINALLY was able to get the brick. I bought three 4’x8’ brick panels - just enough to cover one wall. I didn't just willy-nilly pick this wall either. This is the wall our chimney is on, so if there were a REAL brick wall in this house, it would have been this wall.
Just trying to be architecturally correct. Some houses over do it with brick and just do any wall or all walls which looks super fake because a house wouldn't have random brick walls all over the place. It might have just the exterior walls or just the wall the chimney is built on. Thats just my thought behind it.
Time to cut and measure! My dad did the measuring and i did the cutting. I used a jig saw because it was the easiest since we had already brought the panels up into my room. Plus with the walls being so old, there really are no straight lines so there's no use for a table saw.


Hanging was easy. We brought up the small air compressor and nail gun. We used liquid nails glue to glue up the board, then tacked it with a few nails to keep it in place while the glue sets. Again, our walls are old and not straight, they bow in and out so we needed the extra support from the nails. In a newer house, this wouldn't be an issue.
Don't forget about removing the outlet covers and lifting the plates! Nothing looks more unauthentic than cutting around an outlet cover.
Also, caulk everything. Just do it. All the seams. No project will ever look finished unless you caulk it. between the wall and ceiling. between the wall and trim. Caulk that shit! Click here to see my favorite caulk job tutorial! This helped me out a lot!
For this particular roject, i actually used a lot of caulk in random spots on the grout of this brick. Some on the actual brick faces as well. Just to kind of mask the fakeness by adding imperfections here and there, covering the fake grout look. If you're artsy, im sure you could find other things to use to make this look more real, i just used what i had on hand.


Prime! See? I'm not always forgetting primmer. When it REALLY matters, I never forget to prime. Kilz 2 Latex Indoor/outdoor water base primer is my go-to.
Paint. THIS part of the project was fun. I had bought my choice color a while back when i did Oliver's room. A gallon of Sherwin Williams Superpaint. The color I chose was Snowbound with a Satin finish. I chose the same color for the trim but in a semi-gloss finish.
I've decided on white walls for my room because there isn't as much light in my room. Oliver's room was too well lit and I could go with a dark color without it feeling confining. My room is fairly large but without the proper natural lighting, it feels small and cramped. So a light color it is.


When it did finally become time to paint, I was shocked to find that my whole can of paint had gone bad. I know it was because it had been left outside when we had a frost at some point but I'm still racking my brain to figure out when that happened as I had kept this can of paint in our basement...
Either way, I definitely wasn't happy about having to buy a whole new $50 can of paint. Live and learn i guess.

By the way, over the summer, i had stopped at a storage unit sale and came across this beautiful bed frame And matching mirror. Bought them as a set for $20! Twenty bucks!!! WHAT a steal. It wasn't til i got home that i found the bed frame was a full size instead of a queen but that's ok! I just have the headboard leaning between my bed and the wall. Maybe I’ll make use out of the foot board and use that as the headboard for my sons bed...


Again, sorry for finally getting this up months after, but hey, better late than never right? That's my current life motto.


Omg thank you so mich for reading!!!
Your work is beautiful!